
!Strike is operated by mouse. Just point and click. All working controls are operated with the left (Select) button. The middle (Menu) button provides standard Archimedes menus. You only need to use the keyboard to type your name if you want to save your scores. You can use the Return key as an alternative to the mouse to operate some controls if you find it easier. When you can do this, the control has a double border. (The keys with this facility are Look To / Stand, High score, Enter score and Another. The double border will appear on each when you are most likely to need to use it.)
 Main window For normal operation |
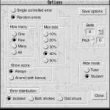 Options window To set different modes of working |
 Scores window To compare with earlier performances |
The Options and Scores windows have a Close control. The Scores window also closes automatically when you select Another task.
!Strike normally starts with Hide mode set to Student. You can set it to Tutor or return it to Student from the Options window. In Student mode, whenever !Strike generates a new error it automatically hides the bell positions from the display. In Tutor mode it will not do this. In both modes, you can use the Show or Hide controls whenever you want.
!Strike rings with 'open hand stroke leads', ie there is a gap equal to one blow before the treble strikes at hand stroke.
To start and stop the ringing at any time click Look To / Stand. NB - !Strike 'Stands' after the tenor's next back stroke.
To speed up or slow down the ringing use the up and down arrow buttons next to the speed display. NB - !Strike measures the speed in changes per minute by timing the ringing, so there is a short delay before the new speed is displayed.
You can change the number of bells ringing and you can raise or lower the pitch of the tenor from the options window .
The main window has two columns, one for hand strokes and one for back strokes, with a row for each bell. The timing of the bell is shown by the position of the bell number within its allocated strip. If the error is zero, the figure is in the middle of the strip. Striking late is to the right and early to the left. The ends of each strip represent half way to the time to when the preceding or following blow should strike. If you have altered the position of a bell during an exercise the original position is shown as a dot.
All position display is suppressed when you select Hide errors , and when you create New errors (in Student mode). The bell numbers are shown in the centre, regardless of the each bell's actual position. To look at the errors at any time select Show errors.
With !Strike set for the Random errors task, you interact with individual bells to make them strike earlier or later. You do this using the arrow buttons at the end of each strip. Click on an arrow button to move the bell in the direction of the arrow on the stroke in question. Each click alters the time of the blow by 5%, (ie it takes 10 clicks to get from the centre to the edge of the strip). The time of the bell's strike moves in response to the buttons even when the errors are hidden so you can't see it's true position.
With !Strike set for the Single controlled error task you can't move individual bells, but you use the same buttons to indicate where you think the error is
For each task !Strike generates one or more errors unknown to you. The type of error generated will depend on the task and the options set.You can do this at any time by clicking the orange New errors button. You can remove the errors by clicking the yellow Remove button at any time to restore perfect ringing. The Remove button is lit whenever there are any errors present. If becomes unlit while you are correcting errors, then you have achieved perfect ringing.
Note that !Strike can generate three different types of error distribution between handstroke and backstroke.
In the control panel at the right of the Main window are some progress indicators. They are normally visible during an exercise and enable you to check how well you are doing. You may think this is cheating, in which case you can suppress the scores until the end of the exercise, and get a bonus score. You by setting Show score in the Options window . The progress indicators are different for each task, and are described there.
The five strips along the bottom of the main window form a dynamic display (not initially activated), which can show bells striking in real time. It shows the strips of five adjacent blows end to end, but unlike the strips in the main position displays, the numbers appear as the corresponding blow is struck and then disappear until the next blow. This display lets you to see the relationships between the size of the gaps and what you hear.
You activate this display by selecting which blows you want to view. Make sure you have Show errors set and then click on a strip in the main display (not on the arrow buttons). The two strips before and after that one will turn black. Start the ringing and as the blows corresponding to those strips are struck they will appear in the dynamic display. They are cleared on the following stroke and then displayed again every time those blows are struck. The example shows the dynamic display centred on the 3rd's handstroke blow.
To inspect another part of the striking, just click on a different strip. You can select the open lead as the central blow by clicking on the white strip above the treble's hand stroke strip. To turn the dynamic display off, click anywhere in the empty space in the main window.
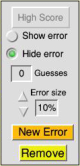 This is a good task to start with. Use the Options window (top left) to select it. (When it is selected, all the options concerned with the Random Errors task will be dimmed as they do not apply.) Close the Options window and the controls at the right of the Main window will look like this.
Start the ringing a select New Error. !Strike will create a 5% error in one of the blows. (It does the calculation during the handstroke gap so will take effect after that.) You can make the error bigger or smaller by clicking on the up and down arrow buttons next to the Error size display.
At each stage listen carefully to the ringing and decide which bell is in error. If you can't hear the error, or you aren't sure which bell is wrong (eg between 3rd being late or 4th being early) then increase the size by another 5% and listen again. When you think you know, test your diagnosis by clicking on the arrow button for the appropriate bell, stroke (hand or back) and direction (early or late). For example if you think the third is close at hand stroke, click the third arrow button down on the left of the hand-stroke column). If you are right, !Strike will show the error to you.
The progress indicator shows how many guesses you have made (unless you have it suppressed to get a bonus score (see Progress indicators ).
At any time you can increase the size of the error to make it easier to hear, or you can Show the error.
!Strike calculates a score for you based on how big you made the error before correctly identifying it, how many guesses you had and how long you took to get the right answer. The High Score control will light if your score is high enough to be included in the league table. (see Scores for details).
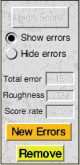 Once you have your ear in this is a more engaging task. Use the Options window (top left) to select it. The related options below it let you control the difficulty of the task. Errors are generated at random, but you can influence the likelihood:
Close the Options window and the controls at the right of the Main window will be as shown.
Select New error and !Strike will generate one or more errors (within the limits you have set). Start the ringing and listen to decide which bell(s) need altering to correct the striking. When you decide which bell needs moving, at which stroke, in which direction, move it using the relevant arrow button next to its strip in the main position display. Since each click causes a 5% change, you will need several clicks to correct big errors.
Then listen to see whether the result is improved, and what further changes are needed.
The progress indicators show how well you are doing (unless you have it suppressed to get a bonus score (see Progress indicators ). There are two measures of how much error remains:
The third indicator shows how fast you are accumulating points (ie reducing errors).
.If your score goes high enough to enter the league table, the High Score control will light up (see Scores for further details).
If you achieve perfect striking, the Remove control will turn off and the total error and roughness scores will show zero (unless you have suppressed them).
Removing all errors is very difficult. Normally, you will get the striking to a point where you can't identify any clear errors to improve it further. Don't worry, that's quite common. Select Show to see how close to perfect striking you got. You may be surprised how far from perfect it is. You may find you have smoothed out the errors rather than getting rid of them all completely. Most people find it easier to do that.
To compare your performance with earlier ones, click Scores (or High Score if it is lit),
You can control how many and what sort of errors !Strike generates for the Random Errors task. Use the Options window to choose from How Many, (Few affects about a quarter and Many about half of the bells), or How big (the errors generated have a random size not bigger than this). !Strike as supplied is set to One and 30%, so it will generate a single error of between 5 and 30% size.
There are three types of error: Isolated, (ie occurring only at one stoke of an affected bell), Both strokes (ie the same error at both strokes of an affected bell) and Odd struck, (ie equal and opposite errors on the two strokes of an affected bell). Select which type you want from Error distribution in the Options window and all errors, whether generated by !Strike or manually by you will be of that type.
The errors generated by !Strike need not follow any pattern (other than repeating every time so you can listen to them more than once) but in real life there often is a pattern. Some bells are odd-struck so they tend to strike early at one stroke and late at the other. Some ringers habitually strike late or early in which case they are likely to do it on both strokes. !Strike offers three types of Error pattern:
Setting other options is described in the relevant section:
If you prefer !Strike to start with different options selected, then select the combination you require and click the Save options control in the Options window. Next time you run !Strike, it will select these options automatically when it starts.
You do not have to take any notice of the scores if you only want to practice your listening skills, but if you want to see how your performance compares with your own earlier performance or with someone else's then !Strike provides league tables that let you do so.
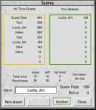
The Scores window shows two lists. All Time Greats remains for ever until someone does better (or you remove the file used to record them). This Session remains while !Strike is running, but is lost when you quit.
There are two separate scores windows and league tables, one for each of the two tasks ( Single Controlled Error and Random Errors ), since the scores on the two tasks are quite different. The window shows both the score and a summary of other results from your latest task, including the time taken.
If your name is not already shown in the score window, select New player and type your name. Click Enter score and your current score will be entered at the appropriate place in the league tables. (Of course you don't have to record your score or give your name if you want to remain anonymous.)
Select Another to close the score window and generate a new exercise for you.
!Strike doesn't ring methods, but you can vary the order the bells ring by using the swap buttons (marked X) at the right of the position displays in the Main window . Click on a swap button and the bells on the lines above and below it will swap places. If !Strike is not ringing at the time the change is immediate, but during ringing, it waits until the next hand stroke lead to make the change (like normal ringing). (NB !Strike can only remember one click, so if you click on more than one X button before the change is made, it will only make the change for the last one.)
Go to: Introduction Operating !Strike Using !Strike by yourself Using !Strike as a tutor
© John Harrison - July 1995, updated August 2014. Website: jaharrison.me.uk