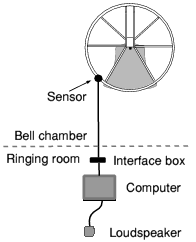
 Most modern simulators use a standard computer running a simulator program, connected to suitable sensors. The diagram shows the key components:
The invention of the ringing simulator in the late 1970s was probably the biggest potential advance in ringing training of the 20th century. Despite this, they are still only fitted in around 1 in 20 towers, and many of those are probably not used as teaching tools, but as a means of providing cheap sound control. This page explains how a simulator works, with practical advice on how to acquire, install and use one.
Most modern simulators use a standard computer running a simulator program, connected to suitable sensors. The diagram shows the key components:
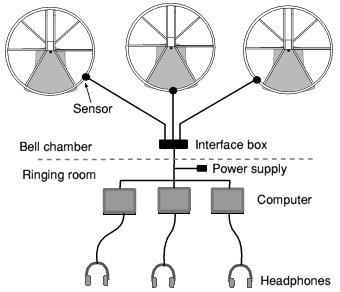 To enable more pupils to practise at the same time, and to provide the ability to practice on bells of different weight, a simulator installation can have more sensors and more computers. The diagram shows three of each, but the number doesn't have to be the same. Many towers fit a sensor to each bell, which gives complete freedom of which to use, and choose the number of computers based on how many pupils they want to be able to ring at once, or possibly other constraints such as space or cost.
A multiple installation has several differences:
Headphones raise several practical issues:
In the early days of simulators there wasn't much choice - you obtained 'a simulator' with a sensor connected to 'a bell'. With the advent of multi-bell interfaces, the use of (usually free) computers, and the capability to connect several at once, there are far more choices.
The cheapest way to acquire a simulator is still to buy (or make) a single sensor and connect it to a single computer running simulation software. If that is all that you can afford, then it is far better to do that than not to have a simulator available as part of your teaching.
But when you start using a simulator, you are likely to find there are times when you need more than this basic system. For that reason, even if you intend to start with a single bell system, it is well worth spending a little more to build in the capability for later extension. There are two ways to do this:
If you have more than one simulator, then you will need to decide what type of headphones to provide. The layout of your tower will probably determine whether you opt for wired or wireless headphones. Your choice of wireless headphones is likely to be influenced both by the number of independent channels that you need, and by what products are readily available at a reasonable price when you are making the decision. So you will need to shop around and do some research.
Simulator software is available from several sources, mostly for computers running Windows, see links.
The interface from the sensors to the computer is likely to be a multi-pin connector intended for the computer's Serial Port. All older computers have a serial port connector, but some modern ones don't, in which case you need to buy a Serial Port to USB adaptor for each that doesn't.
Before you order the equipment, make sure you know where everything will go. Decide where to locate the sensors and how you will fix them to the frame. You may get permission to screw the heads to the frame, but a non-invasive fixing is generally preferable, since it is completely reversible. Some people have used tape, while others have used garden wire, which is a bit more fiddly to fit but is more durable.
Decide where you will put the interface box and where you will run the cables. Everything needs to be secured where it won't get caught, knocked or trodden on by people walking round the frame and climbing in and out of the bell pits. Work out the route of the cable between the bell chamber and the ringing room - where will it go through the floors, how it will be supported and how to protect it from any damage.
In the ringing room, work out where you will put the computer(s) and how you will get power to them. With several computers, headphone charger/transmitters and the power supply for the sensors, you will have a lot of equipment, with a lot of cables and plugs. When you know where everything will go, work out all the cable lengths that you will need. Make sure you have enough, but not so much that you will have a problem stowing the excess tidily.
The physical installation of the equipment shouldn't present any problems to anyone used to moderate DIY, providing you have planned where everything needs to go.
If you are using optical sensors they need to be pointing at the middle of the wheel rim, a few inches away. Don't put the reflective strip on the wheel until after you have connected everything up and applied power.
Then with the bell down and stationary stick the reflective strip so that its centre is in the middle of the spot of light from the sensor, and align it so that the light will pass across its shortest dimension when the wheel turns.
If you are using other types of sensor the detail will differ, but the idea is the same. If you have an older type of simulator that uses two separate reflective strips, then you need to position them so they pass the sensor at the time when the bell would strike. If the sensor is below the pivot, then one reflector needs to be near the garter hole, with the other at the same height on the other side of the wheel. With the sensor in a different position, you need to do some measurement.
Installing the software should be no more difficult than with any other software, but since modern simulator software offers so many options and capabilities, you will need to spend some time familiarising yourself with it.
Before you can use the simulator, you need to configure the inputs (so it knows what signals to use). The instructions for your software should explain how to do this. A few points to watch:
Different simulators offer different facilities, so these notes can only be a guide to what is possible with the one you use.
When using a simulator, you have two separate choices of 'which bell to ring'. The physical choice you will make on the basis of weight, rope behaviour, etc, as you would for solo bell handling, but you also need to choose which simulated bell your pupil will ring (ie which sound out of the ones being produced). Many pupils find it easier to start by being the Tenor. That might be because they hear the row start before pulling off or it might just be being at the end of the row, which is easier to pick out. Some pupils find it harder to listen to the Tenor because the backstrokes are followed by an extra large gap, in which case the 5 (if you are ringing 6) might be a good choice. In any case, once your pupil has got used to ringing with the simulator, you should vary the bell rung in order to develop the habit of 'ring in the same place unless I hear an error, in which case make a small adjustment'.
There are three possible ways to start the ringing, each of which has pros and cons:
With a simulator you have complete freedom to let your pupil ring for as long or as short a time as you judge most useful. No worry what it sounds like outside (it doesn't) nor about what the other ringers will think (there aren't any). If the pupil gets off to a bad start, you can just as easily stop and start again as struggle on. If you see a problem emerge during the ringing you can stop and discuss it while it is fresh, rather than expecting the pupil to remember what was going on afterwards. But providing the ringing is going well, you can let the pupil continue ringing as long as he or she wishes to do so. Make it clear that asking to stop is OK.
If you decide to end the ringing, you may want it to end 'on a high'. For example don't stop during a difficult patch when your pupil might not be able to set the bell on demand. On the other hand, if the pupil is struggling - the striking is getting worse, and/or the pupil is showing signs of distress of fatigue, then it is better to stop sooner than later.
Ideally the simulator would stop at the next handstroke when you tell it to 'stand' but some simulator software doesn't do that. When you tell it to stop it gives an audible 'Stand next' command to the ringer at the end of the whole pull, and stops a whole pull after that. If yours does that, you will have to get used to the slight frustration of not being completely in control of it.
Pupils often have some common problems when ringing with a simulator. These are usually the same problems that they have when ringing together with real ringers, but in the absence of visual cues from moving ropes they are likely to be more pronounced. And with the other bells ringing perfectly they are likely to appear more prominent. See common problems .
When your pupil is reasonably steady at his or her 'natural speed' deliberately vary the speed of the simulator (faster and/or slower) in order to give practice ringing at different speeds. Ringing slowly or quickly (relative to the bell's natural speed) broadens your pupil's range of control and 'comfort zone'. If you have sensors on more than one bell, get your pupil to ring different bells too.
Ringing with the simulator is a good way to help your pupil to develop a rhythmic style of ringing, and to use listening to keep in place. Learning these skills before there are any ropes to follow helps to avoid the tendency that many ringers have of being over-reliant on visual cues for placing the bell. Being able to ring without seeing ropes is an excellent foundation skill, but to cope with real ringing, your pupil also needs to develop ropesight. Not only will that be invaluable for 'navigation' and error correction when ringing methods, it provides a useful safety net for situations when the ringing is so confused it is difficult to hear what is happening, and there is very little rhythm. Being able to 'see' where the bell is from looking at the ropes is extremely valuable. There are two ways to do this. You can mix simulator ringing with visual exercises, for example dodging with another silenced bell. You can also encourage your pupil to stand next to someone during normal ringing and to try to pick things out visually (eg Who am I following? Who is leading?)
You can also introduce an element of ropesight by including another ringer on the bell that the pupil is following. The other ringer must strike accurately, or it will disrupt the pupil's listening and rhythm. Note also that getting used to seeing the rope being followed is only a tiny part of learning ropesight, which is about 'reading' how you fit in among all the other ropes.
When your pupil can confidently ring Rounds with the simulator you can move on to hunting. Explain in advance what happens - not in the usual terms of who to follow, but in terms of speed change and position. To give a feel for how big the speed change is, it may help to start with a visual exercise where you both ring at the same time in a hunting rhythm. You ring at the appropriate speed, saying quick - quick - quick - normal - slow - slow - etc, while your pupil attempts to ring at exactly the same time. Pupils trying to hunt with the simulator the first time often have one or both of these problems:
The simulator that you use may provide other useful facilities that you can use while training, so read the manual.
The Central Council publishes a book on simulators and teaching, see:
http://cccbr.org.uk/bibliography/#simulatorsAndTeaching
Return to Training aidsorEducation